问题
平常开发java应用程序,我们经常会遇到这样的一种场景:开发机使用的是Windows操作系统,但往往程序是跑在Linux操作系统上面的,甚至会调用一些Linux上的程序或者是系统api等,这种情况下我们的程序调试就会变得非常的麻烦。以往解决这种问题的方式一般是在Windows装一个Linux虚拟机,然后将程序部署到虚拟机上进行调试。这种方式虽然可以解决问题,但是总感觉效率太低:一来是虚拟机消耗太多的系统资源,二来编译和部署过程相当的繁琐(虽然你可以自己编写自动化脚本,但总归难以通用化)。
Docker的出现
Docker相比虚拟机来说,拥有更小的系统资源占用,更快的部署速度等优势,而且现在Windows上也能完美的运行Docker服务了。前提条件是要升级到Win10操作系统。至于Windows上Docker的安装非常的简单,Docker官方提供了傻瓜安装包,我们只要一键到底就行了。
安装点我
与maven配合使用
Docker自身提供了丰富RestApi供大家调用,其本身的DockerCli也是通过这些api与其Daemon进程进行交互的,因此我们可以通过编程的方式来使用Docker。我们可以利用maven的插件来完成我们程序的快速部署工作。现下farbric8就已提供了一款功能丰富的maven插件,接下来我们就来看一下如何使用它:1
2
3
4
5
6
7
8
9
10
11
12
13
14
15
16
17
18
19
20
21
22
23
24
25
26
27
28
29
30
31
32
33
34
35
36
37
38
39
40
41
42
43
44
45
46
47
48
49
50
51
52
53
54
55
56
57
58
59
60
61
62
63
64
65
66<plugin>
<artifactId>maven-assembly-plugin</artifactId>
<configuration>
<finalName>ROOT</finalName>
<appendAssemblyId>false</appendAssemblyId>
<descriptorRefs>
<descriptorRef>jar-with-dependencies</descriptorRef>
</descriptorRefs>
<archive>
<manifest>
<mainClass>${mainclass}</mainClass>
</manifest>
</archive>
</configuration>
<executions>
<execution>
<id>make-assembly</id>
<phase>package</phase>
<goals>
<goal>single</goal>
</goals>
</execution>
</executions>
</plugin>
<plugin>
<groupId>io.fabric8</groupId>
<artifactId>docker-maven-plugin</artifactId>
<version>0.18.1</version>
<configuration>
<dockerHost>${dockerHost}</dockerHost>
<useColor>true</useColor>
<verbose>true</verbose>
<images>
<image>
<name>${image.name}</name>
<build>
<from>${image.from}</from>
<ports>
<port>5005</port>
</ports>
<assembly>
<mode>dir</mode>
<targetDir>${container.targetDir}</targetDir>
<inline>
<fileSets>
<fileSet>
<includes>
<include>*.jar</include>
</includes>
<directory>${project.build.directory}</directory>
<outputDirectory>/</outputDirectory>
</fileSet>
</fileSets>
</inline>
</assembly>
</build>
<run>
<ports>
<port>${container.port}:5005</port>
</ports>
<cmd>${container.cmd}</cmd>
</run>
</image>
</images>
</configuration>
</plugin>
我们使用了两个插件,第一个插件将程序和其所有的依赖打进jar包,并指定mainclass,第二个插件就是docker插件了。我们将一些配置提取到property当中,使得这些配置具体一定的通用性1
2
3
4
5
6
7
8
9<properties>
<dockerHost>http://localhost:2375</dockerHost>
<mainclass>nd.com.sdp.Program</mainclass>
<image.from>openjdk:7-jre</image.from>
<image.name>${project.name}</image.name>
<container.targetDir>/maven</container.targetDir>
<container.port>5005</container.port>
<container.cmd>java -agentlib:jdwp=transport=dt_socket,server=y,suspend=y,address=5005 -jar /maven/ROOT.jar</container.cmd>
</properties>
- dockerHost代表DockerDaemon进程所在的主机和其所监听的端口,你如果拥有一台装有Docker的远端机器,这里只要修改主机名和端口号就可以了。
- mainClass指定程序main函数所在的类
- image.from指定要使用的原始镜像,我们使用官方openjdk:7-jre(这里可以修改成任何你喜欢的镜像,Docker灵活性的体现)
- image.name指定我们构建出来的镜像名称,我们简单的使用项目名称代替
- container.targetDir指定了我们编译后的jar包要放到镜像中的什么位置
- container.port指定了容器运行之后要暴露的调试端口,我们的ide就是通过此端口与其进行通信的
- container.cmd容器启动时所运行的命令,这里指定程序以调试的方式启动
我们甚至可以将这些配置作为pom项目install到机器上让其它项目继承,如果你有一台nexus服务器,还可以将其deploy到上面去让团队其它成员使用^_^。
附上fabric-maven-docker-plugin操作手册
调试
配置好pom文件,下面编写一段代码来试一下Linux调试:1
2
3
4
5
6
7
8
9
10
11
12
13
14public class Program {
public static void main(String[] args) throws IOException, InterruptedException {
Runtime runtime = Runtime.getRuntime();
Process process = runtime.exec(new String[]{"/bin/bash", "-c", "ls -l /"});
process.waitFor();
BufferedReader reader = new BufferedReader(new InputStreamReader(process.getInputStream()));
String line = null;
StringBuilder sb = new StringBuilder();
while ((line = reader.readLine()) != null) {
sb.append(line + "\n");
}
System.out.println(sb.toString());
}
}
笔者使用的是Intellij Idea,Eclipse的使用大同小异。首先要点击右上角的Edit Configurations:
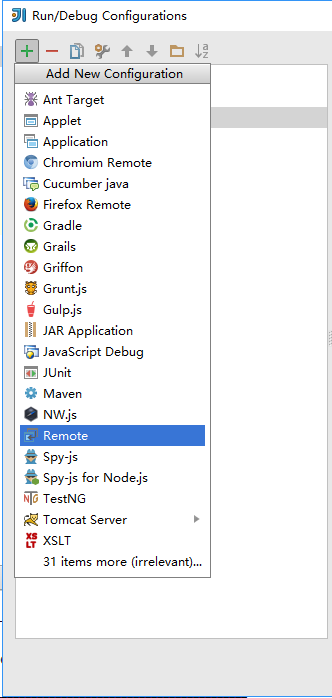
在弹出界面的左上角点击+号,选择Remote:
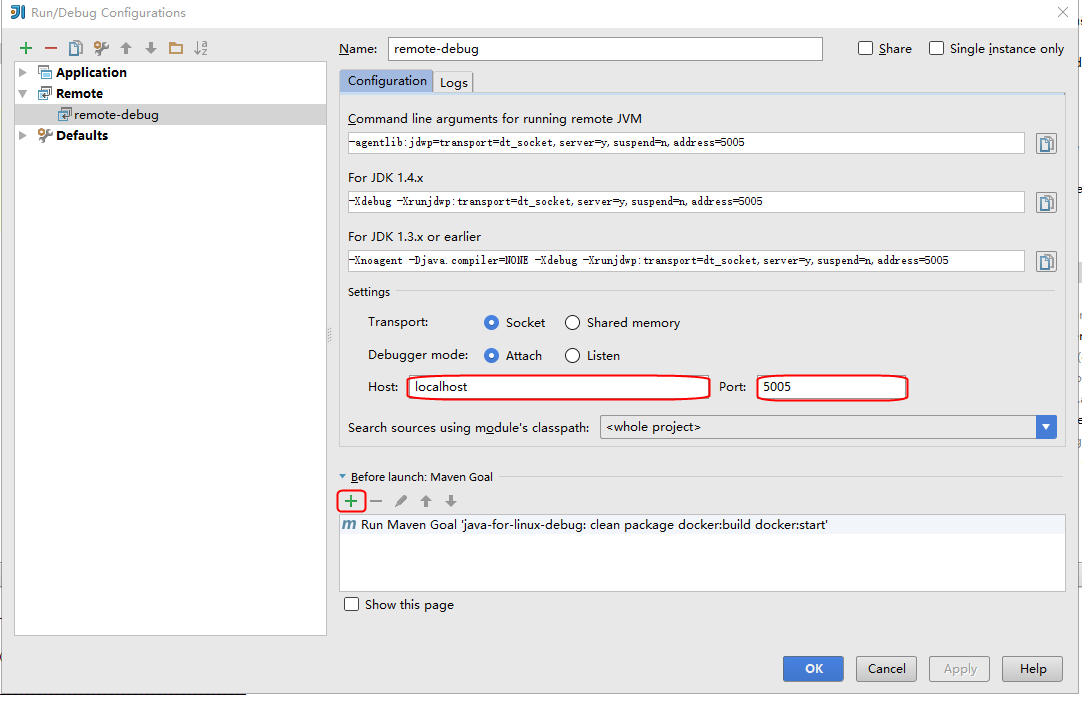
在配置界面中确保Host和Port和我们刚才在Docker插件中配置的值一致:
最关键的一步是添加maven goal,点击+号,在弹出框中输入clean package docker:build docker:start
这一步的意思是编译打包,然后build Docker镜像,最后创建并运行容器,这么多步骤在一个maven命中完成,虽然java那么烂,但好歹有个maven看得过去^_^。
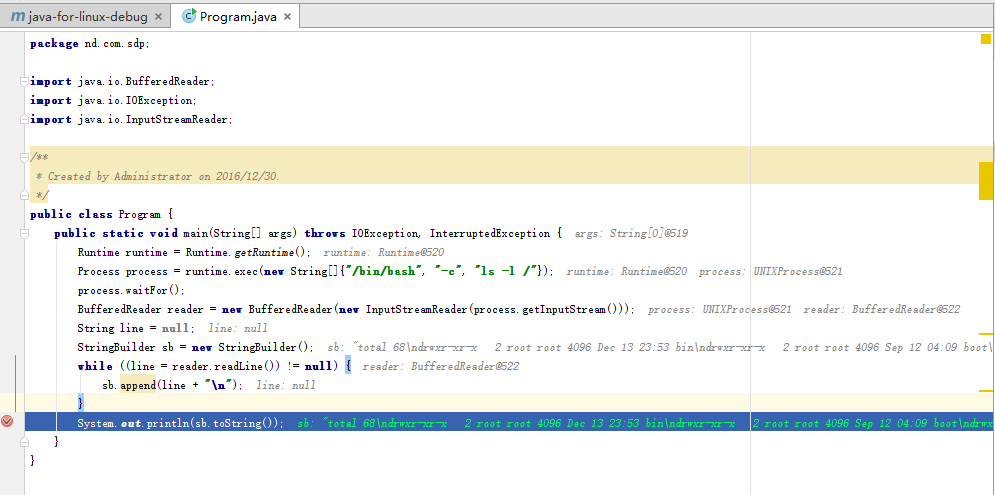
最后使用Shift+F9调试运行程序,可以看到断点命中,整个过程和本地调试体验一样:
(全文完)
